3. Diagnosing, and Troubleshooting
3.2 Recognize when to use common diagnostic utilities and tools. Given a diagnostic scenario involving one of these utilities or tools, select
the appropriate steps needed to resolve the problem.
Utilities and tools may include the following:
Startup disks
Required files for a boot disk
Files required to boot
Windows 9X:
Windows NT/2000
Boot disk with CD-ROM support
Windows 9x: Startup menu for Windows 98 is shown in the figure below. Note that Windows 95 will have Safe Mode With Networking option available, whereas Windows 98 doesn't have that option.
Safe Mode: Windows Operating System automatically initiates Safe Mode if it detects a system boot failure or registry corruption. You can manually select startup options by pressing F8 key when the Windows is starting.
In Safe Mode, only the mouse, keyboard, and standard VGA device drivers are loaded. Safe Mode skips several startup files such as the config.sys, autoexec.bat. It enables you to make necessary changes to these configuration files, and reboot Windows.
Logged (\BOOTLOG.TXT): Useful for logging the drivers and files to bootlog.txt during boot time for further analysis.
Safe Mode With Networking: It is not supported in Windows 98. For Windows 95, network drivers are loaded along with Safe Mode.
Step-by-Step Confirmation: This mode asks you for confirmation for specifying which commands and drivers the system should process while executing each line of the startup files.
Command Prompt Only: You will be able to work at the command prompt after booting.
Safe Mode Command Prompt Only: This mode loads the Command.com. It does not load Himem.sys, or Windows GUI .
Windows 2000/XP:
The boot options menu that appears after pressing F8 key appears as below:
----------------------------------------------------------------------------
Windows Advanced Options Menu
Please select an option:
Safe Mode
Safe Mode with Networking
Safe Mode with Command Prompt
Enable Boot Logging
Enable VGA mode
Last Known Good Configuration (your most recent settings that worked)
Directory Services Restore Mode (Windows domain controllers only)
Debugging Mode
Start Windows Normally
Reboot
Return to OS Choices Menu
Use the up and down arrow keys to move the highlight to your choice.
----------------------------------------------------------------------------------
Important boot menu options (for Windows 2000/XP) are explained below briefly.
Safe Mode - Starts Windows 2000 using minimum required resources. Only mouse, monitor, hard drive, and basic vidio are enabled. No network drivers are loaded.
Safe mode with Networking - Starts Windows 2000 in Safe Mode along with network support.
Safe Mode with Command Prompt - Starts Windows 2000 using minimum required resources for troubleshooting. After logging on, only the command prompt is displayed instead of the Windows desktop.
Enable Boot Logging - Starts Windows 2000 by logging all the drivers and services that were loaded by the system to a file, named ntbtlog.txt. The boot log is useful in analyzing the startup problems.
Enable VGA Mode - Starts Windows 2000 using the basic VGA driver. The basic video driver is always used when you start Windows 2000 in Safe Mode
Last Known Good Configuration - Starts Windows 2000 using the registry information that was saved at the previous successful shutdown. However, this does not solve problems associated with corrupted or missing drivers or files. Any changes made since the last successful startup will be lost.
Debugging Mode - Starts Windows 2000 while sending debug information through a serial cable to another computer.
Diagnostic tools, utilities and resources
User/installation manuals : User manuals and installation manuals are a good source for diagnosing problems associated with respective hardware or softwares. It is strongly recommended that you refer to the manuals first before proceeding with any further action.
Internet/web resources : With the advent of Internet, almost all the hardware/software manufacturers are providing websites that provide support services to their products. There are several third party web resources are also available.
Training materials : Training materials is useful for providing on-job training for employees. Basically, the material should contain product documentation, web resources, and instructions.
Task Manager : Task Manager can be used to monitor key indicators of your computer's performance. You can see the status of the programs that are running and end programs that have stopped responding. You can also assess the activity of running processes, and see graphs and data on CPU and memory usage.
If you are connected to a network, you can view network status and see how your network is functioning.
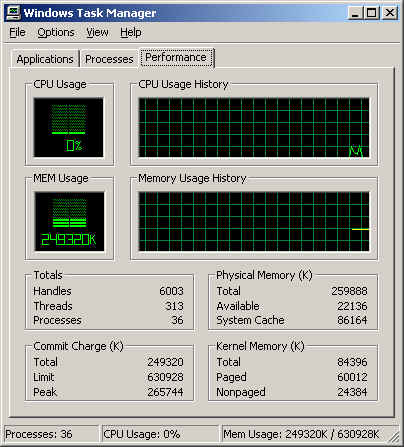
A screenshot of Task Manager is shown in the above figure. It contains tabs for Applications, Processes, and Performance. In Windows 2000/XP, you can get to the Task Manager by pressing Control+Alt+Delete.
Dr. Watson : Dr. Watson for Windows is a program error debugger that gathers information about your computer when an error (or user-mode fault) occurs with a program. Technical support groups can use the information that Dr. Watson obtains and logs to diagnose a program error. When an error is detected, Dr. Watson creates a text file (Drwtsn32.log) that can be delivered to support personnel by the method they prefer. You also have the option of creating a crash dump file, which is a binary file that a programmer can load into a debugger.
If a program error occurs, Dr. Watson for Windows starts automatically. To configure Dr. Watson, follow these steps:
1. Click Start, and then click Run.
2. Type drwtsn32, and then click OK.
By default, the log file created by Dr. Watson is named Drwtsn32.log and is saved in the following location: drive:\Documents and Settings\All Users.WINNT\Application Data\Microsoft\Dr Watson
Boot Disk : Discussed elsewhere in the tutorial.
Event Viewer : Discussed elsewhere in the tutorial.
Device Manager : You can use Device Manager to examine and change software-configurable devices.
To start Device Manager (Win9x):
1. Click Start, and then click Control Panel.
2. Click Performance and Maintenance, and then click System.
3. Click the Hardware tab, and then click Device Manager.
On Windows 2000/XP:
1. Click Start | Control Panel
2. Administrative Tools | Device Manager under System Tools.
Device Manager allows the following functionality:
1. Determine if the hardware on your computer is working properly.
2. Change hardware configuration settings.
3. Identify the device drivers that are loaded for each device and obtain information about each device driver.
4. Change advanced settings and properties for devices.
5. Install updated device drivers.
6. Disable, enable, and uninstall devices.
7. Reinstall the previous version of a driver.
8. Identify device conflicts and manually configure resource settings.
9. Print a summary of the devices that are installed on your computer.
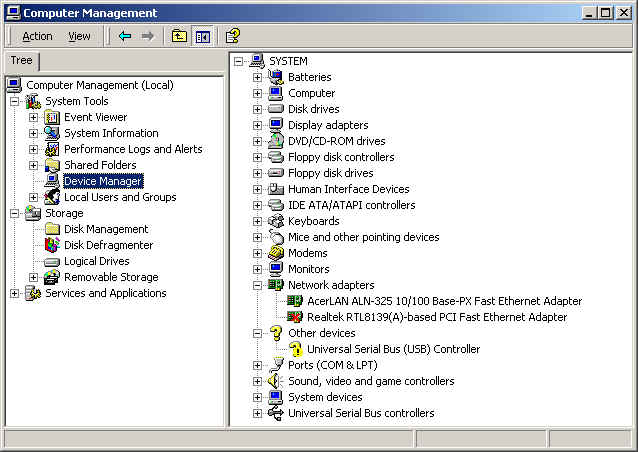
A screen shot of Device Manager on a Windows 2000 system is shown above.
WinMSD : It is a Microsoft Windows diagnostics software. WinMSD reports Memory use, Services, Devices, IRQ's Ports, Environment variables, Network, Hardware including Display adapter.
Command Syntax
WINMSD [\\computername] options
Options:
/a All details
/s Summary details only
/f Send output to a file <computername.txt> in the current directory
/p Send output to a printer
WINMSD with no switches will open the GUI with details of the computer you are logged into.
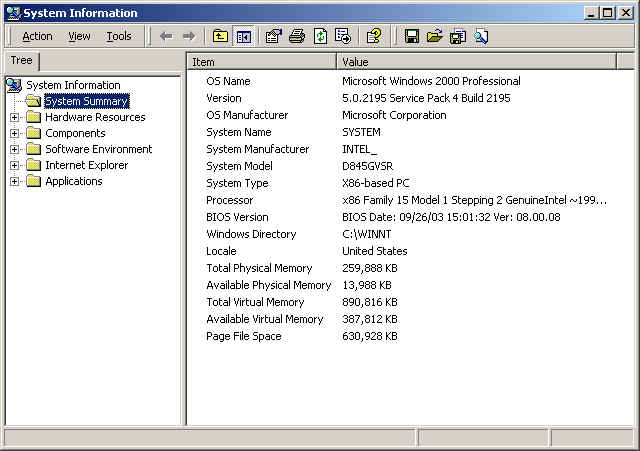
A typical screenshot of the Winmsd is given above.
MSD : Short for MicroSoft Diagnostics, MSD doesn't exist in Windows 2000. In its place, an enhanced systems information screen, MSINFO32 is present. MSINFO32 opens same screen as that of Winmsd.
Recovery CD : Revovery CD was discussed elsewhere.
CONFIGSAFE : ConfigSafe generates an easy to read report of the changes to a system configuration, including updates to:
It can also be used to restore a system to a previously working configuration. Note that it is a third party software, and one need to purchase the software to use it.
Eliciting problem symptoms from customers : When a computer problem is reported, you need to approach the customer and ask for symptoms, such as when the problem was first observed, how often it occurs, whether he could simulate the reported problem etc. These will help define the problem precisely, and solve the same.
Having customer reproduce error as part of the diagnostic process : Ask the customer whether he could reproduce the error. Ensure that you record the log files as it occurs for further analysis, and resolution.
Identifying recent changes to the computer environment from the user : Ask whether the customer had made any changes to the computer recently. Verify the Event Viewer logs, and isolate any error messages. A careful diagnosis will help in faster resolution.
Disclaimer: Simulationexams.com is not affiliated with any certification vendor, and Sim-Ex™ Practice Exams are written independently by SimulationExams.com and not affiliated or authorized by respective certification providers. Sim-Ex™ is a trade mark of SimulationExams.com or entity representing Simulationexams.com.A+™ is a trademark of CompTIA® organization.